Table of Content
- Introduction
- Tools Needed
- Importing Libraries
- Importing Weights of the Model
- Tuning Hyper-parameters
- Importing Image
- Defining Model for Pose Estimation Using Image
- Predicting Output
- Defining Model for Pose Estimation Using Video
- Defining Model for Pose Estimation Using Web-Cam
- Conclusion and Summary
Introduction
In this tutorial we will be implementing human pose estimation using python as a programming language and for overlaying all the 18 skeleton points in a human body we will be using OpenCV. In addition we will use OpenCV to load all the pre-trained deep-learning architecture based on tensorflow. We have already developed a tensorflow model to train these human pose estimation, at the end of this tutorial you will be able to deploy algorithm on pre-stored images, videos and also using web-cam.
Tools Needed
- Install Anaconda
- Packages of multiple Ide’s
- Ide’s (any one)
- Jupyter Notebook
- Spyder
- VSCode
- Install these libraries
- OpenCV
- Pip install opencv – python
Importing Libraries
    import cv2 as cvv
    import matplotlib.pyplot as plt
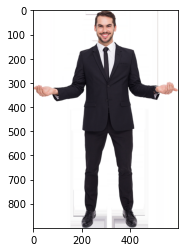
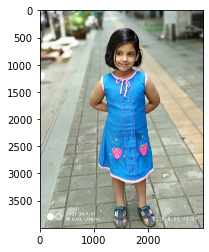
We need some sample still image, video and live feed to test this application. In case of still image we will be using 2 sample , one a very good input data and another a practical real life still. This would help us understand the room available for further improvement as you experiment with this. Download the images, pose estimation image sample 1 and pose estimation image sample 2.
We would also need to download pretrained weightages file. We refer to this as graph_opt.pb file in the code.
We would be using this YouTube dance video of Rhea Rai for our pose estimation on a video file. You can download by clicking dance pose track real life.
Importing Weights of the Model
weights = cvv.dnn.readNetFromTensorflow("graph_opt.pb")
Tuning Hyper-parameters
    Width = 368
    Height = 368
    th = 0.2

    PARTS = { "Nose": 0, "Neck": 1, "RightShoulder": 2, "RightElbow": 3, "RightWrist": 4,
             "LeftShoulder": 5, "LeftElbow": 6, "LeftWrist": 7, "RightHip": 8, "RightKnee": 9,
             "RightAnkle": 10, "LeftHip": 11, "LeftKnee": 12, "LeftAnkle": 13, "RightEye": 14,
             "LeftEye": 15, "RightEar": 16, "LeftEar": 17, "Background": 18 }

    PAIRS = [ ["Neck", "RightShoulder"], ["Neck", "LeftShoulder"], ["RightShoulder", "RightElbow"],
             ["RightElbow", "RightWrist"], ["LeftShoulder", "LeftElbow"], ["LeftElbow", "LeftWrist"],
             ["Neck", "RightHip"], ["RightHip", "RightKnee"], ["RightKnee", "RightAnkle"], ["Neck", "LeftHip"],
             ["LeftHip", "LeftKnee"], ["LeftKnee", "LeftAnkle"], ["Neck", "Nose"], ["Nose", "RightEye"],
             ["RightEye", "RightEar"], ["Nose", "LeftEye"], ["LeftEye", "LeftEar"] ]
Importing Image
    img = cvv.imread("pose-best-case-image-png-format.png")
    plt.imshow(img)
    plt.imshow(cvv.cvtColor(img, cvv.COLOR_BGR2RGB))

Figure 1 : Pose Estimation Image Sample One
Defining Model for Pose Estimation Using Images
    def human_pose_estimation(image):
        IWidth = image.shape[1]
        IHeight = image.shape[0]
        weights.setInput(cvv.dnn.blobFromImage(image, 1.0, (Width, Height), (127.5, 127.5, 127.5), swapRB = True, crop = False))
        o = weights.forward()
        o = o[:, :19, :, :]
        assert(len(PARTS) == o.shape[1])

        pnts = []
        for i in range(len(PARTS)):
            Map = o[0, i, :, :]
            _, conf, _, point = cvv.minMaxLoc(Map)
            X = (IWidth * point[0]) / o.shape[3]
            Y = (IHeight * point[1]) / o.shape[2]
            pnts.append((int(X), int(Y)) if conf > th else None)

        for pair in PAIRS:
            partF = pair[0]
            partT = pair[1]
            assert(partF in PARTS)
            assert(partT in PARTS)

            idF = PARTS[partF]
            idT = PARTS[partT]

            if pnts[idF] and pnts[idT]:
                cvv.line(image, pnts[idF], pnts[idT], (0, 255, 0), 3)
                cvv.ellipse(image, pnts[idF], (3, 3), 0, 0, 360, (0, 0, 255), cvv.FILLED)
                cvv.ellipse(image, pnts[idT], (3, 3), 0, 0, 360, (0, 0, 255), cvv.FILLED)

        t, _ = weights.getPerfProfile()
        frequency = cvv.getTickFrequency() / 1000
        cvv.putText(image, '%.2fms' % (t / frequency), (10, 20), cvv.FONT_HERSHEY_SIMPLEX, 0.5, (0, 0, 0))
Predicting Output
    # Pose estimation called on best case still image sample
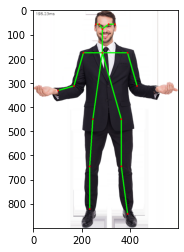
    estimated_pose = human_pose_estimation(img)
    plt.imshow(cvv.cvtColor(img, cvv.COLOR_BGR2RGB))

Figure 2 : Pose Estimation applied on Image Sample One
    # lets import the second sample still image file saved in jpg format
    img = cvv.imread("pose-real-life-image-jpg-format.jpg")
    plt.imshow(img)
    plt.imshow(cvv.cvtColor(img, cvv.COLOR_BGR2RGB))

Figure 3 : Pose Estimation Image Sample Two
    # Pose estimation called on second case
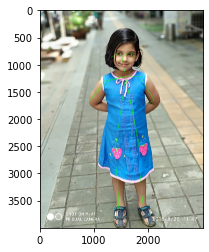
    estimated_pose = human_pose_estimation(img)
    plt.imshow(img)
    plt.imshow(cvv.cvtColor(img, cvv.COLOR_BGR2RGB))

Figure 4 : Pose Estimation applied on Image Sample Two
Defining Model for Pose Estimation Using Video
    capture = cvv.VideoCapture("dance-pose-track-real-life-mp4-format.mp4")
    capture.set(3, 800)
    capture.set(4, 800)

    if not capture.isOpened():
        capture = cvv.VideoCapture(0)
    if not capture.isOpened():
        raise IOError("Cannot Load Video")

    while cvv.waitKey(1) < 0:
        hasimage, image = capture.read()
        if not hasimage:
            cvv.waitKey()
            break


        IWidth = image.shape[1]
        IHeight = image.shape[0]
        weights.setInput(cvv.dnn.blobFromImage(image, 1.0, (Width, Height), (127.5, 127.5, 127.5), swapRB = True, crop = False))
        o = weights.forward()
        o = o[:, :19, :, :]
        assert(len(PARTS) == o.shape[1])

        pnts = []
        for i in range(len(PARTS)):
            Map = o[0, i, :, :]
            _, conf, _, point = cvv.minMaxLoc(Map)
            X = (IWidth * point[0]) / o.shape[3]
            Y = (IHeight * point[1]) / o.shape[2]
            pnts.append((int(X), int(Y)) if conf > th else None)

        for pair in PAIRS:
            partF = pair[0]
            partT = pair[1]
            assert(partF in PARTS)
            assert(partT in PARTS)

            idF = PARTS[partF]
            idT = PARTS[partT]

            if pnts[idF] and pnts[idT]:
                cvv.line(image, pnts[idF], pnts[idT], (0, 255, 0), 3)
                cvv.ellipse(image, pnts[idF], (3, 3), 0, 0, 360, (0, 0, 255), cvv.FILLED)
                cvv.ellipse(image, pnts[idT], (3, 3), 0, 0, 360, (0, 0, 255), cvv.FILLED)

        t, _ = weights.getPerfProfile()
        frequency = cvv.getTickFrequency() / 1000
        cvv.putText(image, '%.2fms' % (t / frequency), (10, 20), cvv.FONT_HERSHEY_SIMPLEX, 0.5, (0, 0, 0))

    cvv.imshow('Pose Estimation Using Video', image)
Defining Model for Pose Estimation Using Web-Cam
    capture = cvv.VideoCapture(1)
    capture.set(cvv.CAP_PROP_FPS, 10)
    capture.set(3, 800)
    capture.set(4, 800)

    if not capture.isOpened():
        capture = cvv.VideoCapture(0)
    if not capture.isOpened():
        raise IOError("Cannot Open Webcam")

    while cvv.waitKey(1) < 0:
        hasimage, image = capture.read()
        if not hasimage:
            cvv.waitKey()
            break


        IWidth = image.shape[1]
        IHeight = image.shape[0]
        weights.setInput(cvv.dnn.blobFromImage(image, 1.0, (Width, Height), (127.5, 127.5, 127.5), swapRB = True, crop = False))
        o = weights.forward()
        o = o[:, :19, :, :]
        assert(len(PARTS) == o.shape[1])

        pnts = []
        for i in range(len(PARTS)):
            Map = o[0, i, :, :]
            _, conf, _, point = cvv.minMaxLoc(Map)
            X = (IWidth * point[0]) / o.shape[3]
            Y = (IHeight * point[1]) / o.shape[2]
            pnts.append((int(X), int(Y)) if conf > th else None)

        for pair in PAIRS:
            partF = pair[0]
            partT = pair[1]
            assert(partF in PARTS)
            assert(partT in PARTS)

            idF = PARTS[partF]
            idT = PARTS[partT]

            if pnts[idF] and pnts[idT]:
                cvv.line(image, pnts[idF], pnts[idT], (0, 255, 0), 3)
                cvv.ellipse(image, pnts[idF], (3, 3), 0, 0, 360, (0, 0, 255), cvv.FILLED)
                cvv.ellipse(image, pnts[idT], (3, 3), 0, 0, 360, (0, 0, 255), cvv.FILLED)

        t, _ = weights.getPerfProfile()
        frequency = cvv.getTickFrequency() / 1000
        cvv.putText(image, '%.2fms' % (t / frequency), (10, 20), cvv.FONT_HERSHEY_SIMPLEX, 0.5, (0, 0, 0))

        cvv.imshow('Pose Estimation Using Webcam', image)
Conclusion and Summary
In this tutorial we used OpenCV and Python for Human Pose Estimation firstly in images then in videos and at last in real time using web-cam. The model predicts all the 18 skeleton points approximately. One thing we need to bear in mind is that apart from the first case, wherein we used customized image in PNG format which was of expected input quality, for the remaining cases we used near life input data examples. For instance, the webcam implementation would have had better results if we would have used a green screen or any solid color background. Hope you would improve this further and comment below. Do read another good implementation of application of OpenCV, CNN and deep learning for face mask detection on image and video.
About the Author's:

Write A Public Review